


Installation Instructions
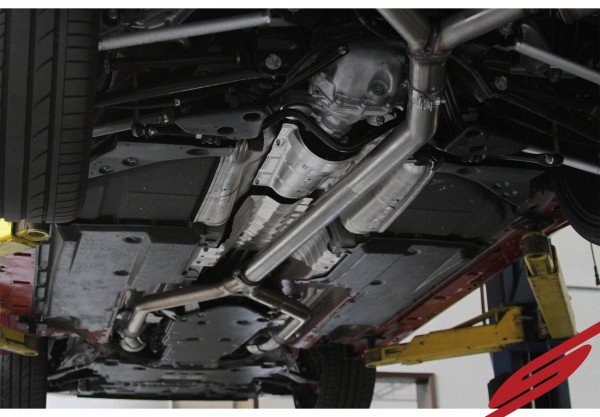
Installation Instructions: STILLEN 2017-2018 Infiniti Q60 3.0TT Stainless Steel Cat-Back Exhaust System with Burnt Tips
24
Jul
Jul
STILLEN 2017-2018 Infiniti Q60 3.0TT Stainless Steel Cat-Back Exhaust System with Burnt Tips
Installing the STILLEN 2017-2018 Infiniti Q60 3.0TT Stainless Steel Cat-Back Exhaust System with Burnt Tips requires basic automotive knowledge and tools. While the following steps provide a general overview of the installation process, it is essential to refer to the manufacturer’s specific instructions and guidelines that come with the exhaust system for accurate and safe installation.
Tools Needed:
- Car jack and jack stands or ramps
- Socket set
- Wrench set
- Hanger removal tool (optional)
- Safety goggles and gloves
Installation Steps:
- Safety Precautions:. Park your Infiniti Q60 on a flat and level surface, engage the parking brake, and ensure the engine is cool before beginning the installation. Safety goggles and gloves are recommended during the installation process.
- Lift the Vehicle:. Use a car jack and jack stands or ramps to lift the rear of the vehicle off the ground, providing enough space to work underneath.
- Unbolt the Factory Exhaust:. Use a socket set and wrench to unbolt the factory exhaust system from the exhaust manifold or catalytic converter. Work your way towards the rear of the vehicle, unbolting any exhaust clamps or hangers that secure the exhaust to the undercarriage.
Remove the Factory Exhaust:. Carefully lower the factory exhaust from the vehicle. If the exhaust is still hanging on any hangers, gently remove them to completely detach the old exhaust system.
- Prepare the STILLEN Exhaust:. Before installing the new exhaust system, check that all necessary components are included, and ensure the exhaust system is properly aligned for installation.
- Install the STILLEN Cat-Back Exhaust:. Carefully lift the STILLEN exhaust into position, aligning it with the exhaust manifold or catalytic converter. Use new hardware if provided and hand-tighten the bolts to hold the exhaust in place.
- Adjust and Align:. Adjust the position of the new exhaust system as needed to ensure proper alignment and clearance from any other vehicle components. Double-check that the exhaust is correctly positioned and aligned for a proper fit.
- Tighten Bolts:. With the exhaust system properly aligned, use the socket set and wrench to tighten all bolts securely. Make sure the exhaust system is firmly attached to the exhaust manifold or catalytic converter, as well as any other connection points.
Check Clearance and Movement:. Ensure that the exhaust system has enough clearance from the undercarriage and other vehicle components. Also, check that the exhaust has sufficient movement and isn’t binding when the vehicle suspension is compressed.
- Recheck Everything:. Once the exhaust system is securely in place, double-check all connections, bolts, and alignment to ensure everything is correctly installed.
- Lower the Vehicle:. Carefully lower the vehicle back to the ground using the car jack and jack stands or ramps.
- Test the Exhaust System:. Start the engine and inspect for any exhaust leaks or unusual noises. Listen for any rattling or vibrations that might indicate improper installation.
Always follow the manufacturer’s specific instructions and guidelines provided with the exhaust system for the safest and most effective installation process. If you are unsure about any aspect of the installation, it is recommended to seek the assistance of a professional mechanic or automotive specialist.